HELP
BANK STATEMENT DASHBOARD
The below numbers correspond to the numbers above for each element in the bank statement dashboard
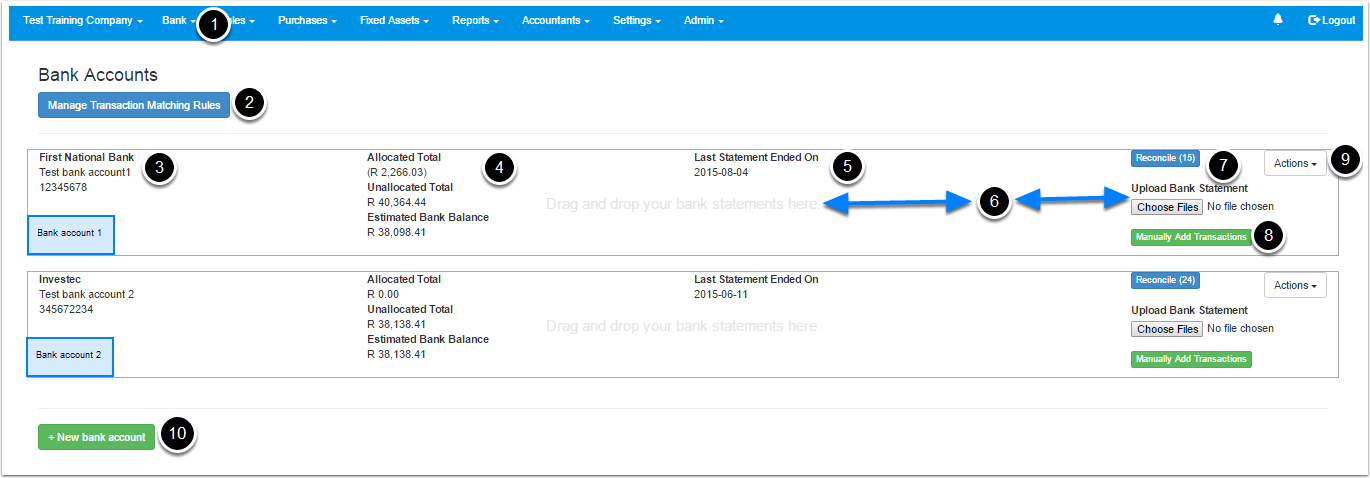
- Navigate to the bank statement dashboard by clicking on “Bank” and then “Dashboard”.
- Edit and delete bank statement matching rules.
- Summary of your bank account information for easy referencing:
- Name of your bank.
- Bank account name.
- Bank account number.
- Summary of the value of your transactions that have been allocated or unallocated and your estimated bank balance.
- For example: you upload or manually input your bank statements with 1 transaction, this transaction has a value of $100, this will fall under the “Unallocated Total”. When you allocate the transaction via the reconcile screen in number 7 this amount will move to “Allocated Total”.
- The “Estimated bank balance” should agree to the balance on your bank statement.
- The latest date of the last bank statement that you uploaded.
- For example: you upload a bank statement from 1 July 2015 to 4 August 2015. The date stipulated will be 2015-08-04. This will assist you with the next bank statement to be uploaded, as you will know that you will need to upload a bank statement from 5 August 2015 to current date.
- The are 2 ways to upload your bank statements.
- You can drag the file from your computer onto your bank account block, or
- You can click the “Choose File” button, locate the bank statement file on your computer and upload it.
- Click this button when you have uploaded your bank statements and want to reconcile the transactions.
- Manually input your bank statement transaction.
- From the actions menu you can click:
- “Edit”: This option will let you edit your bank account details. You can also unreconcile and delete a bank statement that you may have accidentally uploaded. When you unreconcile and delete a statement the system will unreconcile any transactions that you may have allocated on the particular bank statement upload and will then delete the bank statement.
- “Export to CSV”: This option will let you export the unreconciled transactions to an excel csv file.
- Setup a new bank account on Softloft.
UPLOAD BANK STATEMENTS AND CREDIT CARD STATEMENTS INTO SOFTLOFT
How to upload or manually input your bank statement into Softloft
STEP 1 – HOW DO I GET MY BANK STATEMENTS?
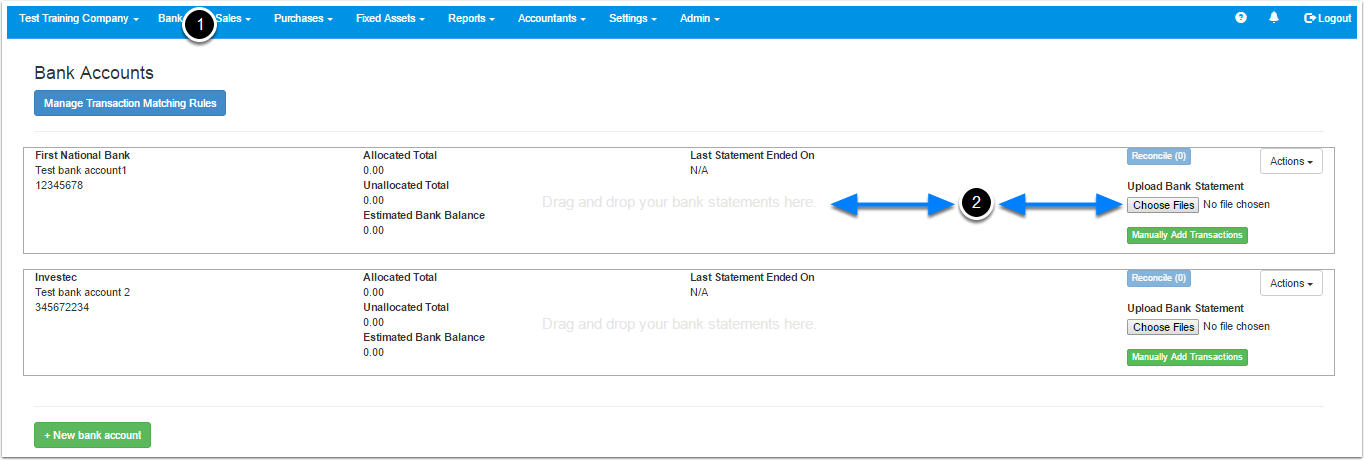
- Navigate to your bank dashboard by selecting “Bank” from the top menu and then click “Dashboard”. You should see your bank accounts that you have setup.
- There are 2 ways to upload your bank statements.
- You can drag the file from your computer onto your bank account block, or
- You can click the “Choose File” button, locate the bank statement file on your computer and upload it.
You will then be taken to the bank statement upload screen.
STEP 2 – FINALIZE THE UPLOAD INTO SOFTLOFT

- You will now need to tell Softloft what to do with each column before you import the statement. In each column select whether the column relates to:
- Date: this is the date of the transaction
- Description: this is the description of the transaction on the bank statement
- +/- Value: select this if the money going out and money coming in to your account are in the same column
- Money coming in: Select this for a column that displays money coming into your account
- Money going out: Select this for a column that displays money going out of your account
- Balance: select the balance column if the import displays your balance after each transaction
- Exclude any rows from the import that you don’t want to import by ticking the boxes in the left hand column (highlighted in yellow above), for example: I don’t want the heading row to be imported as it does not relate to a transaction. Therefore I will tick the box in that row.
- The system will calculate what your closing balance will be after you import your bank statement. Please make sure that this agrees to your balance as per your bank statement. It is important for your bank balance on Softloft agrees to your bank statement as it will ensure that you have completeness of transactions.
- There are a couple reasons why your bank balance on Softloft may not agree to your bank statement:
- You may not have an opening bank balance. Softloft will calculate your bank balance by taking your opening bank balance and then add or subtract your transactions to equal your closing bank balance. Therefore if you are importing bank statements onto Softloft that do not start with a zero balance then you will need to add an opening balance. This can be added if you import your trial balance, add a journal entry or manually add a transaction via the bank dashboard.
- You may have missed a statement.
- There are a couple reasons why your bank balance on Softloft may not agree to your bank statement:
- If some of your cells are highlighted in red it means that the particular cell is not recognized. Ensure the your headings in point 1 are correct and you have excluded the rows in point 2. In this example “Value” was highlighted in red as the top header row of the import needed to be excluded.
- Finally click “Save bank statement”
STEP 3 – RETURN TO THE BANK DASHBOARD
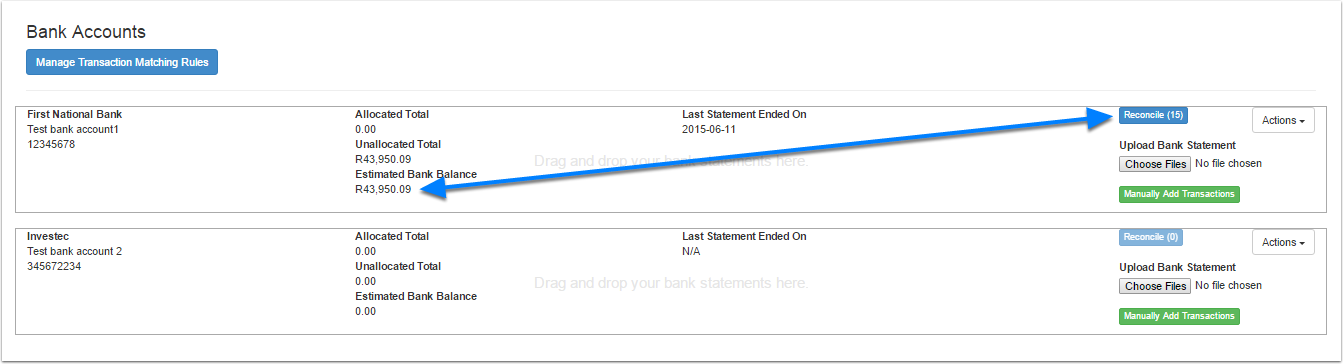
After you save your bank statement you will be directed back to the bank dashboard, where you can see that your estimated bank balance has been updated and there are transactions for you to reconcile.
RECONCILE BANK STATEMENT TRANSACTIONS ON SOFTLOFT
How to reconcile your bank statements on Softloft
WHAT IS RECONCILING IN SOFTLOFT

Bank reconciliation is a way to make sure that all of the transactions on your bank statement are in Softloft. When reconciling you statements in Softloft you will allocate the transactions on your bank statement to the different accounts, invoices and purchase orders in Softloft. This will assist you in tracking your incomes and expenses. Traditionally this was a manual process, but not anymore. Softloft’s intelligent transaction matching will assist you.
- Begin reconciling by navigating to the bank dashboard and then clicking the “Reconcile” button.
ELEMENTS OF THE RECONCILE SCREEN

Each transaction on the reconciliation screen is surrounded by a block. The top portion of the block is the details from your transaction, being the date, description and amount of the transaction. The bottom portion of the block are the methods used to allocate the bank transactions to the different accounts, invoices and purchase orders. If the amount is red, it indicates money leaving your account and if the amount is green it indicates money coming into your account.
Each method used to allocate transactions will be discussed below.
- Manual allocations
- Automatic allocations
- Rule allocations
- Split allocations
- Invoice allocations
- Payable allocations
MANUAL ALLOCATIONS
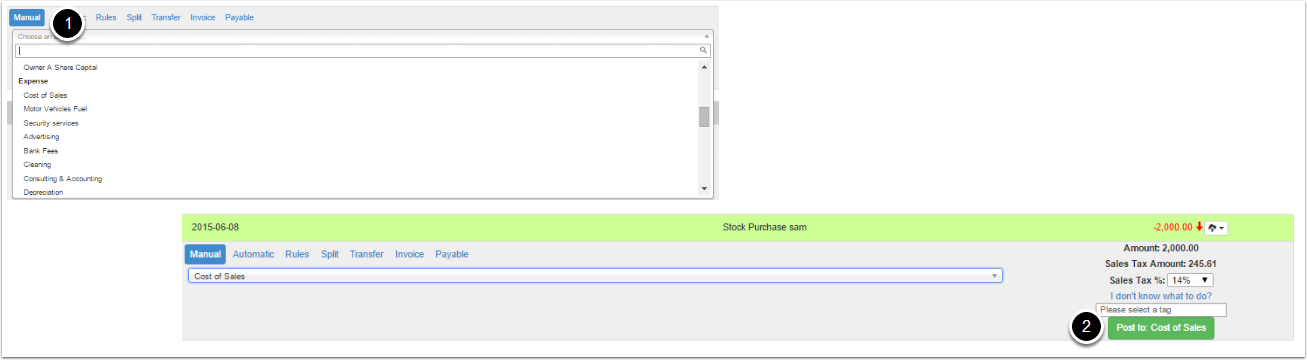
To manually allocate a transaction, ensure that manual is selected and highlighted in Blue
- Click the dropdown list and select an account from the default set of accounts
- Alternatively click the list and start typing the account you are looking for and the system will filter the accounts based on your input.
- Click the account that you want to allocated the transaction to
- You will notice that the transaction changes to green, then click the post button.
This transaction has now been posted to the general ledger and has been removed from your reconcile screen.
AUTOMATIC ALLOCATIONS

Softloft will learn where you have allocated transactions in the past based on the description of the transaction
- I have allocated this transactions description in the past to bank fees.
- Therefore the system finds the most suitable account to allocate this transaction too.
- You will notice that the automatic box is highlighted and the transaction has gone green.
- If you don’t want the systems automatic selection then you can click manual and select another account.
RULE ALLOCATIONS

You can add rules to allocate transactions based on criteria that you setup in the system. Setting up rules largely decreases the time taken to allocate your accounts.
- To do this, click rules
- Click the create rule button
A create rule screen will pop up
SPLIT TRANSACTION ALLOCATIONS

You may need to split a transaction. For example, you may draw money to pay for general expenses, salaries and entertainment. In this example we drew 500.
- To split the transaction click “Split” and then “Split transaction”.
INVOICE ALLOCATIONS

One of the ways to allocate money received to an invoice is through the bank reconciliation screen. Money received can also be allocated against invoices from the Sales dashboard.
- In this example I have received money from a customer called “Client 2”. The customer has now paid me so I will need to allocate the money received to the invoice to show the invoice as paid.
- Click the invoice tab.
- Click the dropdown list and select “Client 2” (if the system has not chosen it already for you).
- You will then see a list of outstanding invoices that relate to that customer.
- The system will give you a percentage match of how close the details and amount received are to the invoice and rank the highest matches first to assist you in allocating. You can also click view to preview the invoice again.
- Click pay on the invoice that you want to allocate the payment too. You will then see an “Add payment” pop-up.
- The “Payment type” shows you that the payment is coming from the bank statement.
- This section shows you the transactions on the bank statement that you want to apply to the invoice. If you can’t find you payment in this section then click the “Show All” tickbox (as highlighted in yellow) and locate the payment.
- The box that is ticked on the bank transaction listing shows you which bank transaction we are going to apply against the invoice.
- Click “Add Payment” to allocate the amount against the invoice.
- The amount received has now been allocated to the invoice, removed from my reconciliation screen and marked as paid.
PURCHASE / MY BILLS ALLOCATIONS
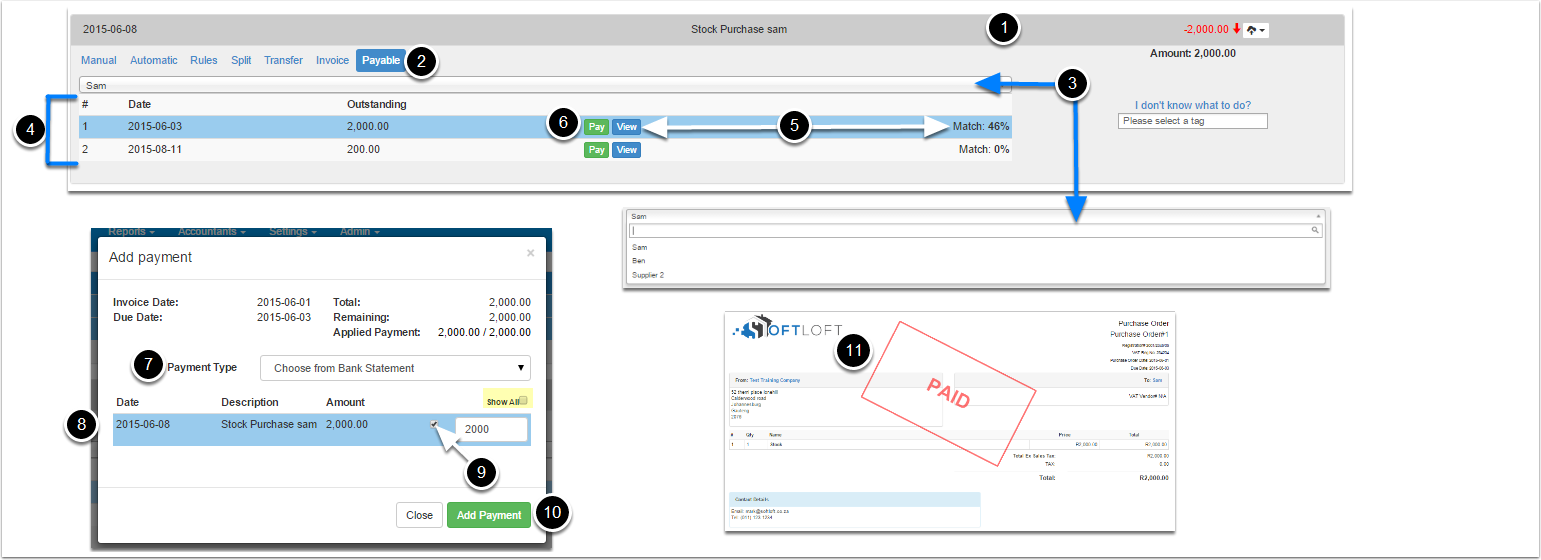
PLEASE NOTE: Invoice and purchase/payable allocations and creations are the done in the same manner in Softloft
One of the ways to allocate money paid to a purchase order is through the bank reconciliation screen. Money paid can also be allocated against purchase orders / My bills from the Purchases dashboard.
- In this example I have paid money from a supplier called “Sam”. I have paid the supplier so I will need to allocate the money paid to the purchase order to show the purchase order as paid.
- Click the Payable tab.
- Click the dropdown list and select “Sam” (if the system has not chosen it already for you).
- You will then see a list of outstanding purchase orders that relate to that customer.
- The system will give you a percentage match of how close the details and amount paid are to the purchase order and rank the highest matches first to assist you in allocating. You can also click view to preview the purchase order again.
- Click pay on the purchase order that you want to allocate the payment too. You will then see an “Add payment” pop-up.
- The “Payment type” shows you that the payment is coming from the bank statement.
- This section shows you the transactions on the bank statement that you want to apply to the purchase order. If you can’t find you payment in this section then click the “Show All” tickbox (as highlighted in yellow) and locate the payment.
- The box that is ticked on the bank transaction listing shows you which bank transaction we are going to apply against the purchase order.
- Click “Add Payment” to allocate the amount against the purchase order.
- The amount paid has now been allocated to the purchase order, removed from my reconciliation screen and marked as paid.
SALES DASHBOARD
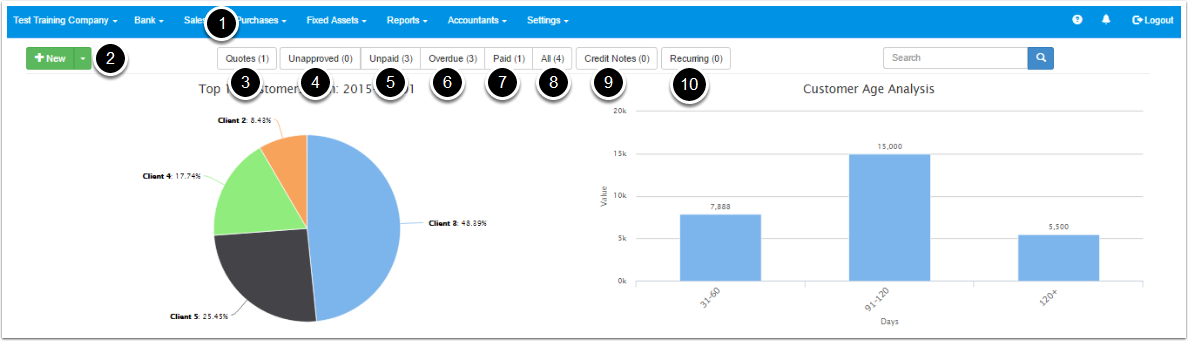
The below numbers correspond to the numbers above for each element in the sales dashboard
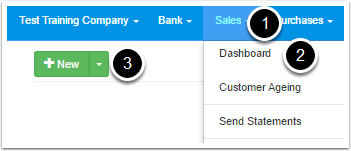
- Navigate to the sales dashboard by clicking on “Sales” and then “Dashboard”.
- Create a new invoice of quote.
- View all the quotes created for your company.
- View all the unapproved invoices created for your company.
- View all the unpaid invoices created for your company.
- View all the overdue invoices created for your company.
- View all the paid invoices created for your company.
- View all the invoices created for your company.
- View all Credit notes created for you company.
- View all recurring invoices created for you company.
SALES INVOICING
How to create an invoice
STEP 1 – NAVIGATE TO NEW INVOICE PAGE
- Click “Sales”
- Select “Dashboard”
- Click “New”
STEP 2 – CHOOSE A CUSTOMER
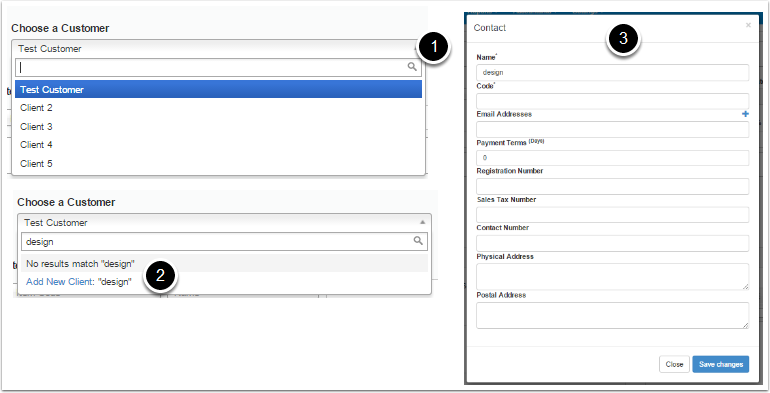
- After selecting the “choose a customer” dropdown list you can either select a customer that has already been created, Or
- If you start typing the customer name in the box provided and you can’t find your customer then click the “Add new client ” link to setup a new customer.
- This will take you to the add new contact page. From here you can create your new customer.
STEP 3 – PROJECT NAME AND DATES
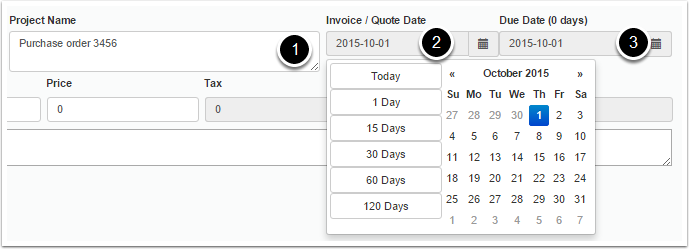
- You can enter a project name: this field is not mandatory but can be used for example to enter a purchase order number. This project name will be displayed on the invoice.
- Select the invoice date
- Select the Due date: by default this is set to the same day as the invoice date. However when you setup a customer you can select payment terms (eg 30 days), if this is entered when you setup the customer then the due date will be calculated by the system to reflect the payment terms and can still be edited from this date picker.
STEP 4 – ENTER ITEMS ONTO THE INVOICE
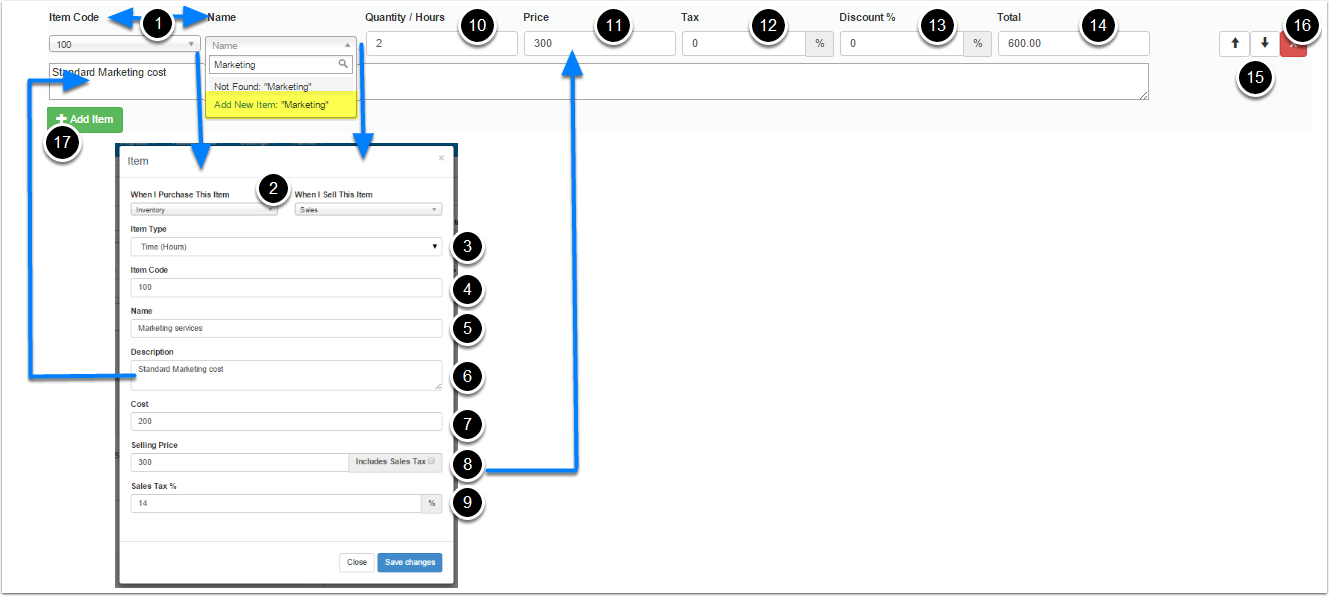
- Select the name/item code of the item to add to the invoice.
- Either select the name of the item from the dropdown list or the item code, as each item code is related to the name of each item.
- If you don’t have any items setup then start typing the item name and then click the “Add New Item” as highlighted in yellow above. From this screen you can now setup a new item
- Items are setup when you purchase goods/services and sell goods/services therefore you can leave the default accounts, as they are. If for example you want items that you sell to go to a different account (i.e. not the sales account as indicated by default) then select a different account from the dropdown list.
- Select the item type: you can set this as
- “Quantity” – if the item being setup is for the sale of goods
- “Time (Hours)” – if the item being setup is for the sale of services.
- Enter an item code. Item codes are a reference number for each item and cannot be duplicated.
- Enter a name of the item. When this item is setup, this name will be displayed in the dropdown list in number “1” for you to use in future. This name will also be displayed on the invoice for you customer.
- Enter a description of the item. This will populate the description box under each item on the invoice. This can also be entered manually when doing the invoice and does not necessarily need to be done when you setup you items.
- A cost price per item can be setup for each item. This is not mandatory when setting up an item.
- A selling price per item can be setup for each item. This is not mandatory when setting up an item and can be edited on the face of the invoice should your selling price per item differ.
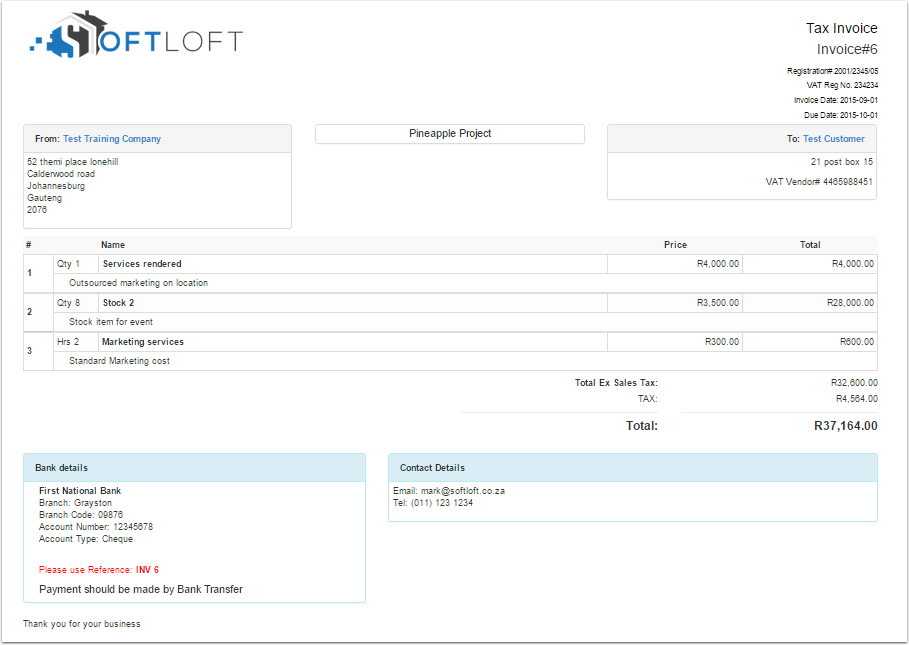
- If you are registered for sales tax / Vat then you can apply the sales tax rate for each item. The system will use this to calculate the total sales tax for the invoice.
- Enter the Quantity/Hours for the cost or time spent on the item.
- Enter the selling price for one quantity or hour of the item.
- In the example above the price is 300 per hour and I have selected 2 hours, therefore the total is 600 for the line item.
- Enter the Sales tax / Vat percentage if you did not setup this percentage in in point “9”.
- A discount percentage can be added to each item on the invoice.
- The total of the line item is calculated by the system and includes sales tax / Vat. When the invoice is generated the Sales tax / Vat will not be shown on each line item but rather a total figure at the bottom of the invoice.
- The up and down arrows allow you to move line items up and down the invoice. For example if you have 3 items on an invoice and you want the item that is second on the invoice to be shown first on the invoice then click the up arrow.
- The “X” will allow you to delete a line item from the invoice.
- The Add Item button allows you to add additional items to the invoice.
STEP 5 – CHOOSE A BANK ACCOUNT TO APPEAR ON THE INVOICE AND ADD AN ADDITIONAL FOOTER
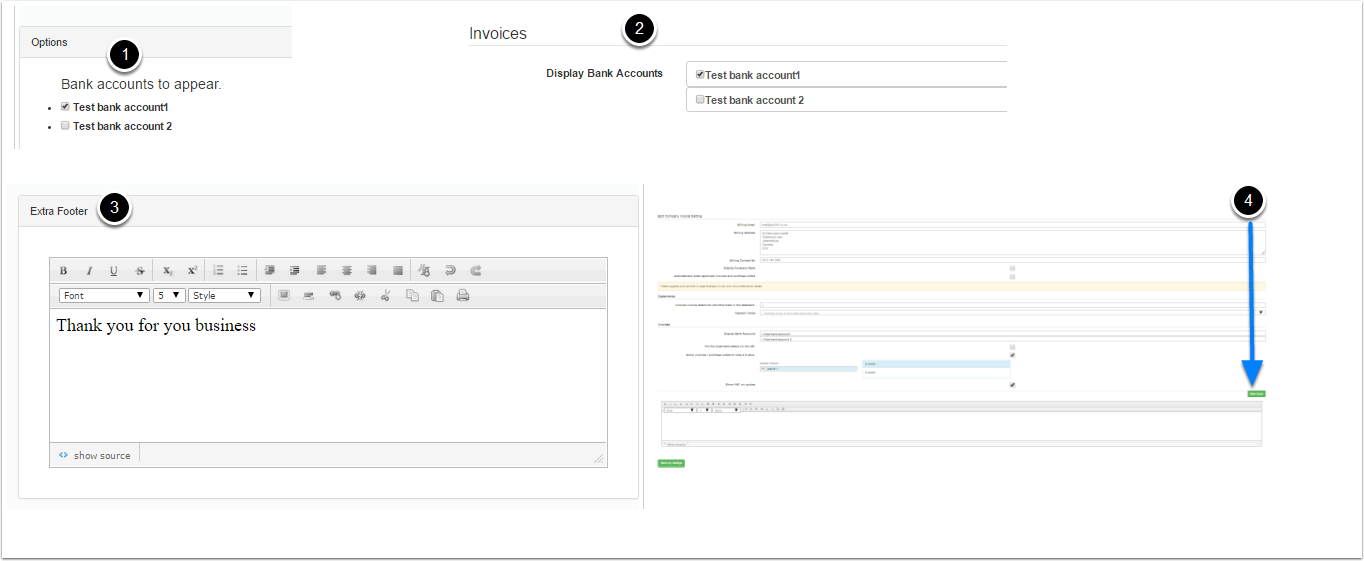
- Select the bank account details to be displayed on the invoice. You should select the bank account that you want your customer to pay into. By default all bank accounts that you have setup on softloft will be displayed here.
- You can setup you default bank account to be displayed on the invoices by clicking “Sales” in the top menu and then going to “invoice settings”. Scroll down to Invoices and select your default bank as per the picture.
- You can add an additional footer to your invoices to display a note to your customer
- You can add a default footer to your invoices by clicking “Sales” in the top menu and then going to “invoice settings”. Click the Green “New Footer” button at the bottom of the page, add you footer in the box provided and click “Save my settings”. This footer will now be added to all your invoices.
STEP 6 – SAVE YOU INVOICE OR SAVE AS A QUOTE

- Now save as an invoice or a quote.
- If you save a quote you will be able to covert the quote to an invoice at a later stage.
INVOICE EXAMPLE
RECURRING INVOICES
How to setup recurring invoices
CREATE RECURRING INVOICES
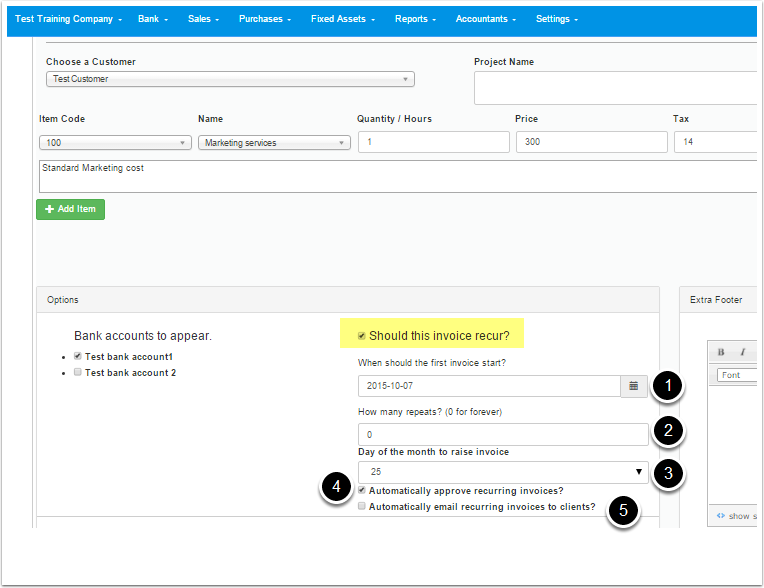
Recurring invoices can be setup when creating a normal invoice. Click Sales from the top menu and then “+ Invoice / Quote” . You will now be on the standard invoice creation screen. Create your invoice as normal for your customer. If you now want this invoice to recur every month (eg if you bill the same customer the same amount every month) click the “Should this invoice recur” tickbox as highlighted in yellow above.
- Select a starting date: This is the date that the recurring invoice will start from. This will not be the date on the invoice but will rather allow you the start generating recurring invoices for a future month. The date on the invoice will be selected as per point number 3.
- Select how many months you want the invoice to recur: if you are unsure you can select “0” which indicates that the invoice will recur indefinitely. You can then delete the recurring invoice if you don’t want the invoice to recur in the future. The date picker will only let you select a date from tomorrow as you can’t generate recurring invoices from a prior date.
- Select the day of the month that you want the invoice to be generated on the system (this will also be the invoice date): For example if I select the 25th of the month, the system will generate an invoice on the 25th of every month starting at 2015/10/07 (Point 1 above). The invoice will not be generated now but only on the day of the month you have selected.
- Select the “Automatically approve recurring invoices” tickbox if you want the invoices to be approved when they recur. If you don’t select the tickbox then the invoices will be generated on the day stipulated in point 3 and will sit in your unapproved invoices section.
- The access your unapproved invoices, navigate to the sales dashboard and click the tab “Unapproved”. from this tab you can approve invoices.
- If you want the invoices to be sent to customers automatically after they have been generated and approved then select the “Automatically email recurring invoices to client” tickbox.
DELETE RECURRING INVOICES
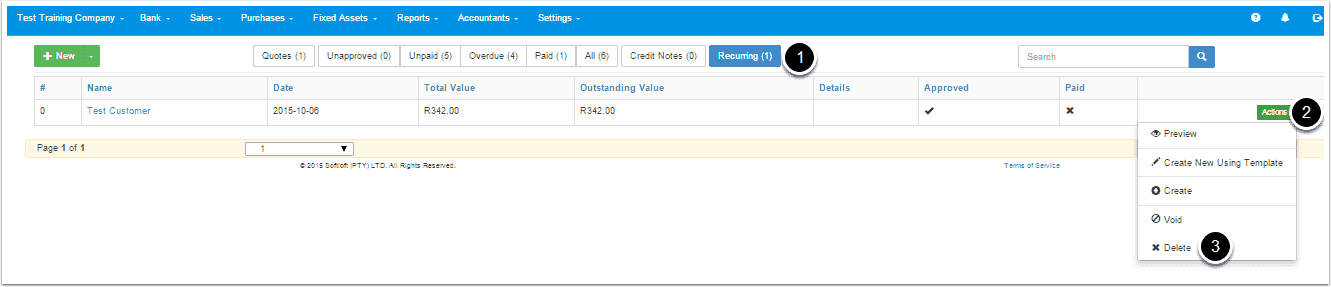
Navigate to the sales dashboard
- Click the “Recurring” tab.
- Click the actions button next to the invoice that you want to delete.
- Click delete.
This will not delete any invoices that have already been generated on prior dates.
CREDIT NOTES
How to create and delete credit notes
WHAT IS A CREDIT NOTE:
In buy and sell transactions, whether it is a credit transaction or cash, credit note is used to modify the invoice already issued and such modifications may be necessary due to following reasons:
- Return of goods due to either of the following reasons:
- Mistake in invoice
- Cancellation of order (I.e. no sale or purchase transaction took place)
- Waiving off partly or whole of the sale consideration involved
STEP 1 – CREATING A CREDIT NOTE

- Navigate to the Sales dashboard and click on either “Unpaid”, “Overdue” or “All” tab to display your invoice that you want to apply a credit note to.
- On the right hand side of the invoice, click the “Actions” button
- On the drop-down menu click “Credit note”
STEP 2 – CREATING A CREDIT NOTE
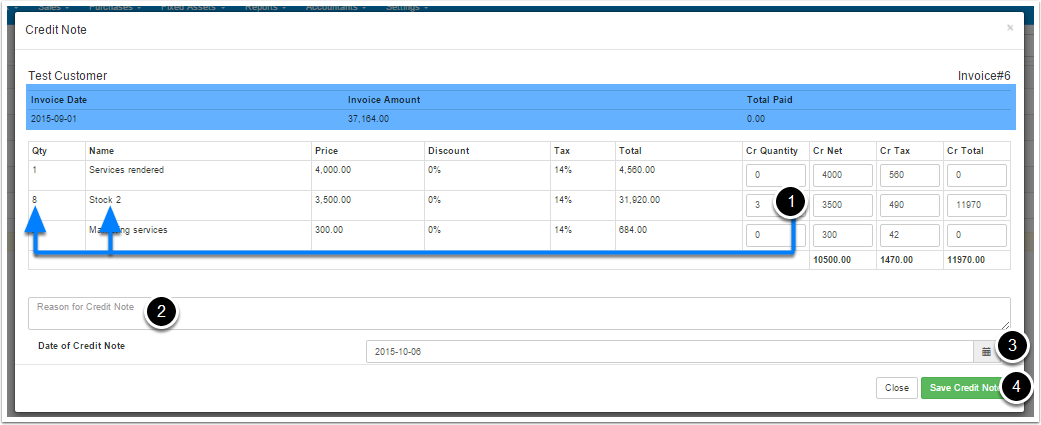
The pop-up screen will show all the items that relate to you particular invoice that you want to add a credit note to. It will show the Invoice date, invoice amount and total amount that has already been paid on the respective invoice. You cannot credit note an invoice for more than the invoices amount outstanding (I.e. invoice amount less amount paid)
- Find the line item that you would like to credit and add the quantity. In this example I have 8 items of “Stock 2” on the invoice an I want to credit 3 of them, so I enter the number 3 in the “Cr Quantity” column. The system will do the calculations for you.
- You can also change the “Cr Net”, “Cr Tax” and “Cr Total” columns and the system will recalculate the other amounts for you.
- Enter a reason for the credit note (this is not mandatory but may assist in the future when looking back at previous credit notes).
- Select a date for the credit note.
- Click “Save credit note”.
VIEWING AND DELETING THE CREDIT NOTE
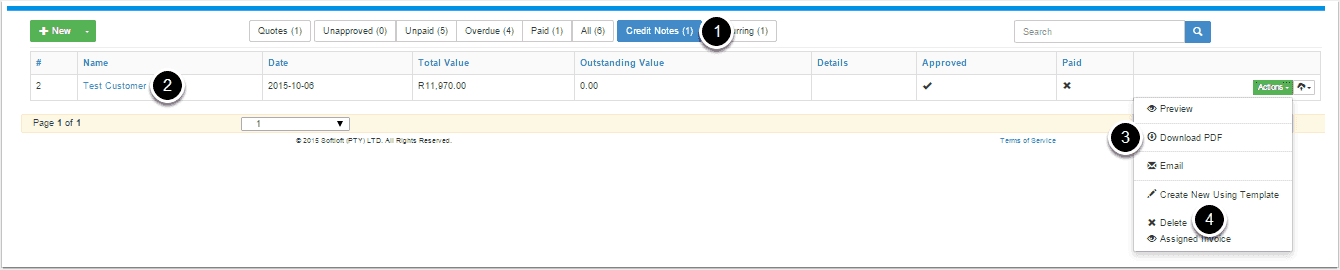
- o view the credit note, navigate to the sales dashboard and click the “Credit note” tab.
- You can now see the credit note that was generated. This credit note is applied to the customer.
- From the actions menu on the right of the credit note, you can:
- Preview the credit note in your internet browser
- Download a PDF of the credit note
- Email the credit note to the customer
- To delete a credit note, click “Delete”
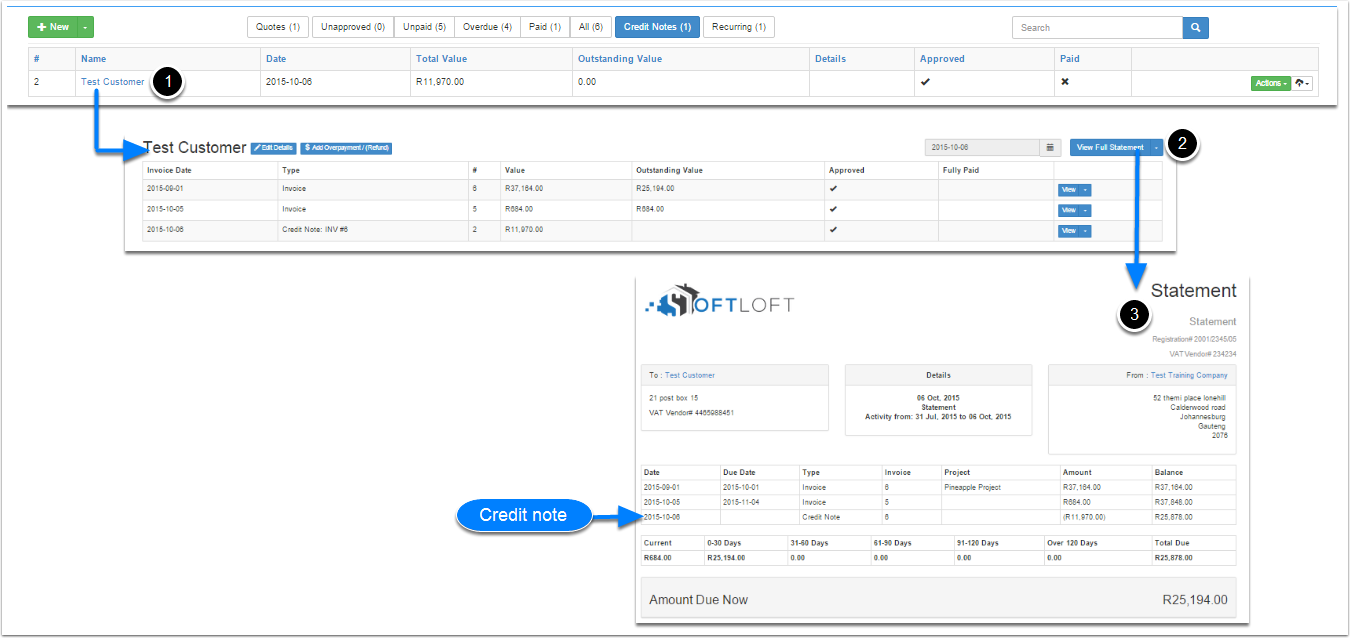
VIEWING THE CREDIT NOTE ON THE CUSTOMER STATEMENT

- To view the credit note on the customer statement, click the customer’s name. This will take you to that customers screen.
- This screen will show you the full history of invoices / credit notes to that customer. If you click the “View Full Statement button” you can see the statement for the customer.
- You will now see on the statement that the customer’s statement has been affected by the credit note.
VIEWING AND EMAILING INVOICES
How to view and send invoices to your customers
VIEWING AN INVOICE
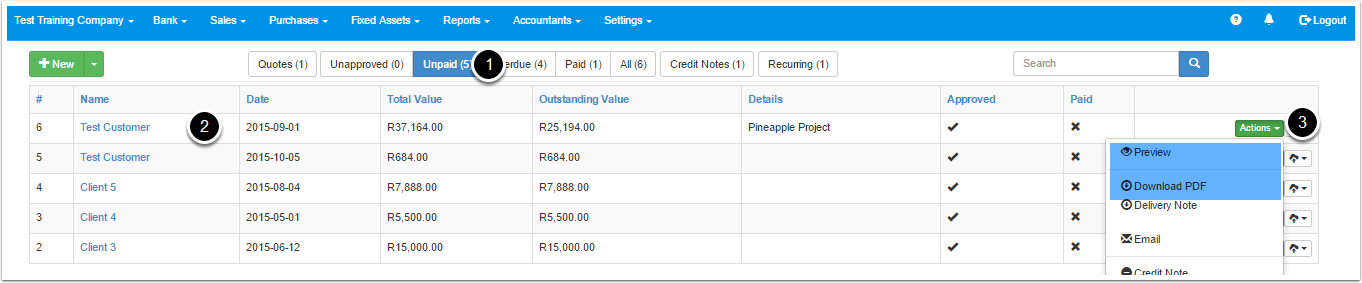
- Navigate to the sales dashboard by clicking “Sales” from the top menu and then “Dashboard”. Select the relevant tab to find the Invoice that you want to view.
- Find the customer’s name and invoice number that you want to view.
- To view the invoice click the actions button for the relevant invoice. The actions menu will let you:
- Preview the invoice: This will open the invoice in your internet browser, or
- Download PDF: This will let you download the invoice and open in a PDF viewer (eg. Adobe PDF)
EMAILING AN INVOICE FROM THE SYSTEM
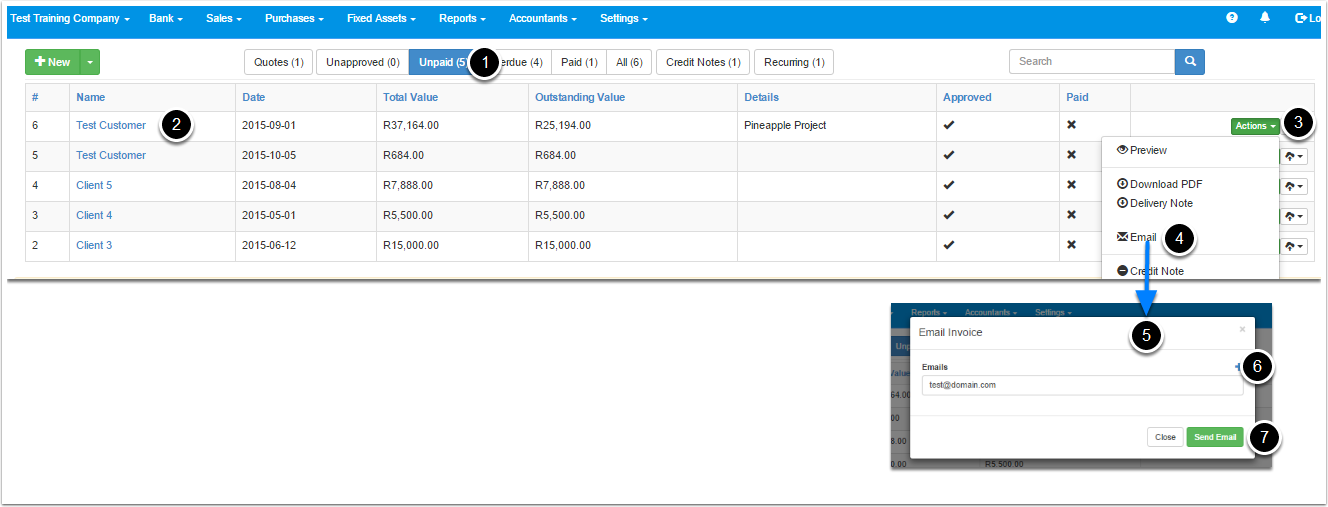
- Navigate to the sales dashboard by clicking “Sales” from the top menu and then “Dashboard”. Select the relevant tab to find the Invoice that you want to email.
- Find the customer’s name and invoice number that you want to email.
- To email the invoice click the actions button for the relevant invoice.
- Click email
- A pop-up will appear with the email address that you want to send the invoice too.
- The email address will be prepopulated with the email address of your customer (only if you added the email address when you setup the customer)
- If there is no pre-populated email address then enter your customers email address.
- If you want to send the invoice to multiple customers then click the blue plus sign and add another email address.
- Click “Send email”. Your invoice has now been sent to your customer as a PDF attachment.
UPDATING YOUR EMAIL SETTINGS

You can only update your email settings if you are on the paid version of Softloft.
Updating your email settings will let you change your “from address” when emailing your customers. When you update the “from address” on Softloft to your email address, the email will come from your email address and if customers reply to the email sent by the system, then the email will be sent directly to your email address. If you do not update this address then the email sent from Softloft to your customer will not have a reply address.
How to update your email settings
Navigate to invoice settings by clicking “Sales” from the top menu and then “Invoice settings”
- Scroll down to email settings.
- Enter in the email address that you want your customers to reply to, should they reply to an email sent by you from Softloft.
- Enter the “From name”: This should be your company name.
- Enter a Blind copy address (this is not mandatory): you can enter you own email address here, therefore when you email anyone from the Softloft system, you will be blind copied on the email.
- Click “Save my settings” at the bottom of the page.
VIEWING AND EMAILING STATEMENTS
How to view and send statements to your customers
VIEWING AND EMAILING CUSTOMER STATEMENTS
- Navigate to the sales dashboard by clicking “Sales” from the top menu and then “Dashboard”. You can search for your customers name in the search box
- Find and click the customer’s name in the “Name” column.
EMAILING STATEMENTS TO ALL CUSTOMERS
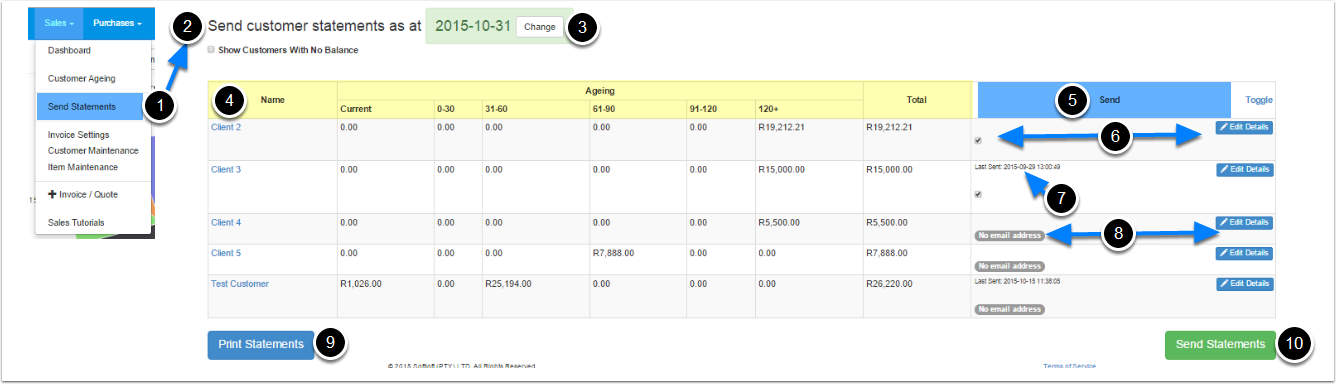
- Click “Sales” from the top menu and then click “Send statements”.
- You will be taken to the send customer statement screen.
- Change the statement date for the customers that you want to send the statements too.
- Please note: the statements will be sent today for the period ended in the date selected. Therefore you can send the statements on the 3rd October (today) as at the end of September.
- The table shows you a list of your customers and how much money each customer owes you known as a customer ageing. The amount owed to you is split into days based on invoices that are overdue for payment.
- Next to each customer is you can select which customer you want to send statement too. The “toggle button” will select all or deselect all checkboxes.
- If you see a checkbox that has been ticked then you have entered and email address for the client. You can check the email address by clicking edit detail for that customer. The statement will be sent to each customer with a ticked checkbox. If you don’t want to send a statement to a particular client then simply untick the checkbox.
- “Last sent” will show you the last date at which you sent your customer a statement.
- If you see no email address then click the “Edit details” button and enter your customers email address.
- You can print the statement to PDF
- Click “Send statements” and the system will send the statements to each customer that has a checkbox ticked.
UPDATING YOUR EMAIL SETTINGS

You can only update your email settings if you are on the paid version of Softloft.
Updating your email settings will let you change your “from address” when emailing your customers. When you update the “from address” on Softloft to your email address, the email will come from your email address and if customers reply to the email sent by the system, then the email will be sent directly to your email address. If you do not update this address then the email sent from Softloft to your customer will not have a reply address.
How to update your email settings
Navigate to invoice settings by clicking “Sales” from the top menu and then “Invoice settings”
- Scroll down to email settings.
- Enter in the email address that you want your customers to reply to, should they reply to an email sent by you from Softloft.
- Enter the “From name”: This should be your company name.
- Enter a Blind copy address (this is not mandatory): you can enter you own email address here, therefore when you email anyone from the Softloft system, you will be blind copied on the email.
- Click “Save my settings” at the bottom of the page.
IMPORT CUSTOMERS
How to import customers using our template
STEP 1 – NAVIGATE TO CUSTOMER MAINTENANCE
If you want to import a list of your customers, you can do so using our excel template
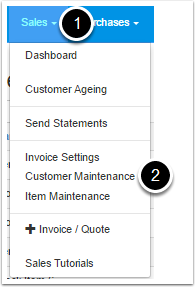
- Click “Sales” from the top menu.
- Click “Customer maintenance”.
STEP 2 – ADD CUSTOMERS USING OUR TEMPLATE
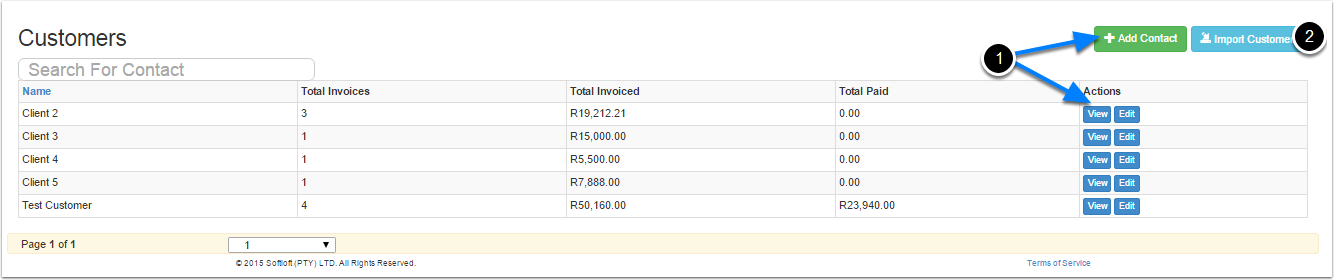
- You will now be on the customer maintenance screen. from this screen you can view all your customers, edit your customers and add a customers one by one using the “+ Add Contact” button.
- You can import a list of pre-existing customer by clicking the “Import customers” button.
STEP 3 – DOWNLOAD THE TEMPLATE AND UPLOAD ONCE YOU ARE DONE
- Once on the import customer screen, click the Download link to download an excel file for you to complete.
- Open the excel file that you have downloaded.
- Open the file and complete the details (as per the headings on the excel file) of your customers for import. Do not change or add any headings.
- Then save the excel file to your computer.
- Now upload the file into Softloft.
- Click the choose file button, and locate the file on your computer.
- Click “Submit”
Your customers have now been imported into Softloft.
PURCHASES DASHBOARD OVERVIEW
In this help guide we will go through Purchase order / My bills dashboard elements
PURCHASE ORDER / MY BILLS
The below numbers correspond to the numbers above for each element in the sales dashboard
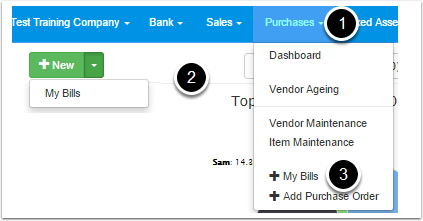
- Navigate to the Purchase order / My bills dashboard by clicking on “Purchases” and then “Dashboard”.
- Create a new Purchase order / My bills. If you click on the green”+New” button you will create a new purchase order. If you click on the dropdown arrow and then “My Bills” you will create a new “My Bill”
- View all the purchase order quotes created for your company.
- View all the unapproved purchase orders created for your company.
- View all the unpaid purchase orders / bills created for your company.
- View all the overdue purchase orders / bills created for your company.
- View all the paid purchase orders / bills created for your company.
- View all the purchase orders / bills created for your company.
CREATING A PURCHASE ORDER OR MY BILL
How to create a purchase order or “My bill” on Softloft
WHAT’S THE DIFFERENCE BETWEEN A “PURCHASE ORDER” AND A “MY BILL” IN SOFTLOFT
- A purchase order is a commercial document issued by a buyer to a seller, indicating types, quantities, and agreed prices for products or services the seller will provide to the buyer.
- A “My bill” is a quick way to create a liability on Softloft and make sure you pay all your creditors on time. For example, each month you pay your telephone bill, this is paid on the 2nd of the next month, therefore I will raise a “My bill” at the end of the previous month and when I pay the bill on the 2nd I will offset the payment against the liability.
CREATING A PURCHASE ORDER
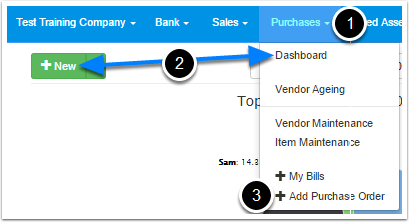
- Click Purchases from the top menu.
- Either select “Dashboard” and then click new, Or
- Click the “+ Add purchase order” to create a purchase order.
CREATING A MY BILL